How to use the Schedule
How to organise and share shift schedules, track working hours, swap shifts, and manage absence/vacation with Ziik's Schedule module.
Topics in this Article
💡 Permissions and what you can do in the Schedule
Schedule shifts
Correct working hours
Track working hours
Swap shifts
Manage vacation and absence
👩💻 How to navigate and use the Schedule on desktop
Overview
How to schedule shifts
How to correct working hours
How to add absence categories
How to register or request absence
How to view and answer Absence requests
How to use available shifts and shift swapping
How to use templates
🤳 How to navigate and use the Schedule on the app
Overview
How to schedule shifts
How to correct working hours
How to use available shifts and shift swapping
How to make your shift available to colleagues
How to apply for or take available shifts
How to approve shift swaps
How to register or request absence
How to answer absence requests
💡 What can you do in the Schedule?
Role permissions determine what tools users have access to in the Schedule module. Determining what users can do in the module, is set up by a platform administrator under Roles.
Schedule shifts
Scheduling shifts can be used to keep track of who is working when and where.
- Users with the permission “Can manage all shifts” can schedule, edit and delete shifts for users in their own unit and sub-units. The permission also provides access to reports on shifts and worked hours of users in their own unit and sub-units.
- Users with the permission “Can manage own shifts” can schedule, edit and delete their own shifts. If certain employees set their own schedule, this permission lets them do this, without allowing them to manage other users’ shifts.
Correct working hours
“Corrected working hours” allows users to register corrections to the hours scheduled in shifts. If you use the module for timekeeping, you can let chosen roles correct the hours in everybody's shifts or only in their own.
- Users with the permission “Can manage all corrected hours” can register corrections to shifts scheduled for users in their own unit and sub-units. This permission enables managers to register that an employee worked more or less than the scheduled time.
- Users with the permission “Can manage own corrected hours” can register corrections to their own shifts. This permission enables employees themselves to register that they worked more or less than the scheduled time.
Track working hours
Shift scheduling and corrected working hours are two tools that can be used to register and track how much employees have worked during a given period.
- For full-time staff and recurring shift schedules you can use templates to streamline the scheduling process.
- Let selected roles register their own hours by giving them the permission "Can manage own shifts".
- Allow for deviations from the scheduled hours to be registered by letting employees correct their own hours with the permission “Can manage own corrected working hours”, or let managers correct any users’ hours with the permission “Can manage all corrected working hours”.
- Users with the permission “Can manage all shifts” or "Can manage all absence" get access to the Reporting tab, providing them an overview of shifts and hours worked by each user in their own unit and sub-units during a given period. To access data on shifts and hours for a certain period, click the Reporting tab, choose unit, and define the time span. Click a user to view all their shifts. In the top right corner, click Export to download a CSV file with the data.
- All users without the permission “Can manage all shifts” can access data only on their own shifts and hours during a defined period. For an overview of your own shifts and hours in a given period, click My hours.
Swap shifts
- Users with the permission “Can open own shifts for swaps” can choose to make their own shifts available for their colleagues.
- Users with the permission “Can manage all shifts” can schedule non-assigned available shifts.
- Users with the permission “Can apply for shifts” can register their interest in open and available shifts.
- Users with the permission “Can approve shifts” can see the list of users that have applied for an open or available shift, and assign the shift to one of them.
- Users with the permission “Can take shifts without approval” can directly take open and available shifts, without approval.
Manage vacation and absence
Let managers register vacations or absence or allow staff to request time off.
- As a site admin, you can set up custom Absence Categories covering common reasons for time off, such as "Home with illness", "Working remotely" or different types of leave.
- Users with the permission “Can register absence for everyone” can register absence for any user in their own unit or sub-units.
- Users with the permission “Can register own absence” can register only their own absence, without needing approval.
- You can allow users to submit approval requests absence by giving them the permission “Can request absence”.
- If you allow absence requests, someone needs permission to answer the requests. Users with the permission “Can answer absence requests” can approve or decline absence requests made in their unit and sub-units. Users with this permission will receive a push notification if the request is made by a user in their own unit. A push notification will also be sent to the requesting user, about whether the request was approved or denied.
👩💻 How to navigate and use the Schedule on desktop
Overview

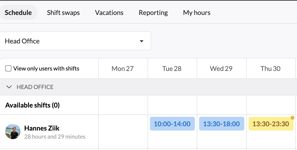
Blue = Assigned shift
Yellow = Available shifts and shifts opened for trade
Grey = Holidays
How to schedule shifts
Each user has its row where all their shifts and absences appear.
To assign a person a new shift:
1. Place your cursor on the box that covers the right day on that person’s row
2. Press the + icon that appears. A new window will open where you depending on your permissions may be able to decide whether to create a shift or vacation.
3. Click shift, and set the hours.
You have the opportunity to add notes that are only visible for planners (those with the permission "Can manage all shifts" - see permissions) and comments that all users can see.
To save the shift press the blue button on the lower right corner of the window.

How to correct working hours
To register deviations to scheduled hours
1. Click an existing shift followed by the three dots in the top right corner
2. Click Correct working hours
In the example below, Bob worked 2 hours longer than scheduled, so he corrected his working hours. In the overview, you can see both the scheduled hours and the corrected ones.


How to add absence categories
"Vacation" exists as an absence category by default.
Site admins can add other categories by following the below steps:
1. On the web app, click the admin cogwheel in the top right corner, then Categories
2. Under "Absence", add any types of absence you want to be able to register in the schedule. You can add translations to different languages yourself, so that your users see the Category name in their preferred language.
3. Click Create

3. The categories are ready to be used in the schedule for those with permission.
How to register/request absence
To register or request absence, you must have the appropriate permission as described in under permissions.
1. Go to the Schedule
2. Hover your cursor over a day and user in the schedule and click the plus sign that appears
3. Depending on your permission, click "Create absence" or "Request Absence"
4. Choose days and select one of the created Absence Categories
5. Add an optional note
6. Click save
How to view and answer Absence requests
To view and answer absence requests, you must have the appropriate permission as described above.
1. Go to the Schedule
2. Click "Absence Requests" to view all unanswered requests
3. Click one of them
4. Click "Approve" or "Decline"
How to use available shifts and shift swapping


How to approve shift swaps
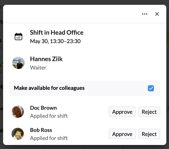
Users with the permission “Can approve shifts” can see the list of users that have applied for an open or available shift, and assign the shift to one of them. If you have permission to approve shifts, you will see a dot on a shift that has applicants.
1. Click an available or open shift marked yellow that has a dot on it
2. Approve one of the applications


How to create available shifts

How to use templates
If you have recurring weekly schedules you can save these as templates to avoid having to put in the shifts every week. To create a template:
1. Assign all the shifts for that week
2. View the options by clicking the three dots in the top right, then Save current week as template
3. Give the template a name, e.g. "odd weeks" or "full time staff"
Once you have saved it you can apply it to an upcoming week:
1. Go to the week on which you want to apply the template
2. Click the three dots, then Apply template to current week and then choose the template you wish to apply.

🤳 How to navigate and use the Schedule on the app
Overview
See an overview of the schedule on the image below:
1. See all unanswered requests
2. Create new shift or absence
3. View all shifts in your unit(s) in the selected week
4. View all your own shifts in the selected week
5. See any available shifts in your unit(s) in the selected week
- Slide the date bar to browse between weeks

How to schedule shifts
1. Click the "+" button in the top right corner
2. Depending on your permissions, you may choose between creating a shift or a vacation
3. Click "Create shift"

-
- To create a non-assigned "Available" shift, leave the user field empty
- If you have the permission "Can manage own shifts" but not "Can manage all shifts", your own name will be locked in
5. Set date and time
6. Comments can be viewed by all users, Notes can only be seen by planners i.e. users with the permission "Can manage all shifts"
7. Click Save
How to correct working hours
The feature “Corrected working hours” allows users to register deviations to the hours scheduled in shifts.


How to use available shifts and shift swapping
Shift swapping is managed through a number of permissions.
You may be allowed to:
- Make your own shifts available to colleagues
- Apply for open and available shifts
- Take available shifts without approval
- Approve shift swaps
Let's cover these one by one.
How do I make my shifts available to colleagues?
- Click the shift you want to open for swapping

- Click "Make available to colleagues"


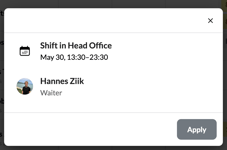
- Your shift will be marked yellow, and users with permission to can now apply for or take your shift

How do I apply for or take available shifts?
Shifts that are non-assigned will appear as green and shifts that colleagues have opened for swapping will be yellow in the overview. You can navigate to "Available" in the bottom menu to see all shifts that are either available or open for swapping.

If you have permission to apply for available shifts:
- Click an available shift

- Click apply

3. A manager will be able to view all applicants and either assign the shift to one of them or deny the shift swap
If you have permission to take available shifts without approval:
- Click an available shift

- Click take

- The shift is yours

How to approve shift swaps?
If you have the permission "Can approve shift swaps", you will receive a push notification when a user has applied for a shift. You can find an overview of all the requests by clicking the button highlighted below.

Shifts with applicants will be viewed

Click a shift to view shift details and the applicants

Assign the shift to one of the applicants by clicking the check mark, or reject them by clicking the X
How to register or request absence
To schedule or request absence:
1. Click the plus in the schedule overview

2. Depending on your permissions, click request or register absence

3. Choose the person you are registering absence for
If you have the permission "Can manage own shifts" but not "Can manage all shifts", your own name will be locked in
4. On Category, select the type of absence

4. Define the time, add a note if you wish, and click save

4. Users in your unit, with permission to answer absence requests, will be notified
How to answer absence requests
If you have the permission "Can approve vacation requests", you will receive a push notification when a user in your unit requests absence.
To view any vacation requests:
1. Open the schedule and click the button highlighted below.

2. Click a request to see the details.

3. Choose to accept or reject the request. The user will be notified.